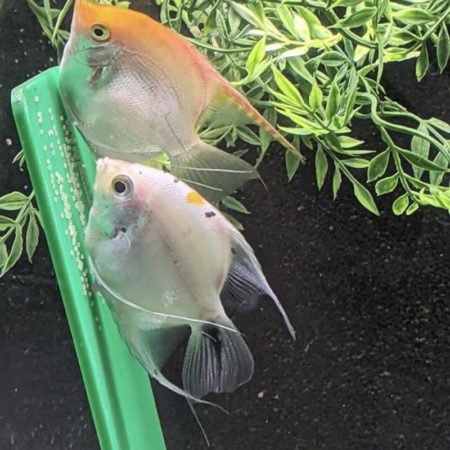
Your angelfish will be able to lay eggs in your aquarium, which is a very exciting thing to witness. Angelfish are finally ready for mating after forming a pair.
Hopefully, you will be able to watch their eggs hatch and see their offspring. Your aquarium will be able to have a larger number of angelfish as a result of this.
I’m sure if you’ve been learning about angelfish breeding, then you’ll know that things don’t always go as smoothly as they should. There are times when natural hatching eggs fail. In these situations, it might be better to hatch angelfish eggs artificially.
In this article, I will provide you with all information about hatching angelfish eggs artificially and how to remove angelfish eggs from the tank safely.
Related Articles:
- How To Tell If Angelfish Eggs Are Fertilized?
- Why Are Angelfish Eggs Turning White? 5 Best Ways To Avoid
- Angelfish Laying Eggs: 6 Important Things You Need To Know
- Will Angelfish Lay Eggs Without Male? How It Affect The Eggs
- Angelfish Eggs Fungus: How To Treat And Prevent Effectively
- All About Angelfish Eggs: Stages, How To Care, How They Look
- Pregnant Angelfish Behavior: Clearest Signs That Indicate Spawning
Hatching Angelfish Eggs Artificially
In ideal conditions, you can leave it up to the angelfish parents to take care of this process on their own. Nevertheless, there are situations where you are absolutely required to intervene in order to artificially raise angelfish eggs. A few examples would be:
- The angelfish parents are young and inexperienced, they might eat the eggs
- When the parents are overly territorial, they may fight other fish; removing the eggs will help prevent this.
- The parents may have died, leaving the eggs to hatch on their own.
- The parents may have abandoned the eggs.
- In order to help the parents to reproduce at a fast pace again, you may want to encourage them to do so by removing the eggs.
No matter what the situation is, the eggs of angelfish can be artificially hatched. You need to follow these steps:
Locate The Eggs
You might already know where your eggs are in your tank if you’ve decided to raise them. In some cases, angelfish may spawn in secluded areas of the tank, out of view of other fish, so they will be better protected. Therefore, they may be difficult to detect. To locate the eggs:
- Look for a smooth, clean area. Angelfish prefer to spawn here.
- Check out the decorations. There is a possibility that your angelfish laid her eggs against a surface or sucked them up against the side of a plant. Be sure to check from all angles.
- Take note of where the parents are guarding. Both parents will be swimming around the eggs, assuming they are both still alive.
In case you plan on breeding angelfish on a regular basis, then investing in spawning plates could be a good idea. Spawning plates provide a perfect spot for angelfish to lay eggs, as well as being easy to remove the eggs. This simplifies the process of finding and transferring the new offspring.
Make Sure The Eggs Are Fertilized
Only when the eggs were fertilized, did they catch. You can’t do the fertilization process artificially. So, you have to make sure that the males have fertilized the eggs before you move them.
These fertilized eggs are brownish with translucent, amber tones. On the other hand, the unfertilized eggs will turn white.
Decide Where To Move The Eggs
It’s not a good idea to keep the new eggs in the same tank with the rest of your fish. The eggs will quickly become a meal if the parents are not there to protect them. It is even possible that the parents may eat their eggs. You have two options for moving the eggs:
A Fry Basket: It is the simplest option since you will not need to purchase a second tank, cycle the new water, or purchase a new filter.
The fry basket works as a mesh net or small container that is used to hold the eggs. It will keep the eggs away from the other inhabitants of your tank when placed in your original aquarium. They will use available water in the tank, reducing your guesswork. However, you can’t use this method for a long as the fry basket can’t hold them forever and can cause your tank overcrowded.
A New Tank: Using this method, you can let the fry grow to a safe size before getting reintroduced to the original aquarium. It is considered a long-term solution.
A new tank provides you with more space, security, and the ability to quarantine the fry. During these early hours, the eggs will be vulnerable to disease, so if a disease spreads in the original tank, it will spell death for them. However, there is a downside. It will mean getting new water, cycling the tank, checking the parameters, and, of course, investing in a completely new aquarium.
Use The Same Water
Keeping your eggs in original tank water is the healthiest and safest option. If you use a fry basket, there is no problem. Just make sure that the chemical balance is properly maintained, and try not to make any sudden changes until the eggs hatch.
In the case of housing the eggs in a new aquarium, you can use the water from the original tank to fill the new aquarium. Since the eggs just require a small tank, remove a little bit of water from the parent’s aquarium for the fry won’t harm them.
Use The Same Water
Occasionally, you may not be able to use the same water. For example, maybe your initial tank has some sort of infection, or maybe something has damaged the tank in some way, making the water null and void.
Whatever the case may be, raising angelfish eggs in new water is risky. In that case, you can:
- You can ask for water from the pet store. They have well-cycled and well-maintained aquariums already available. It is an unusual request, but most are willing to accommodate it.
- In the case where you must use tap water, make sure that you use a water conditioner that will neutralize the chlorine in it.
- As a result of the fungus in your previous tank, spores could follow your eggs to their new tank. Use methylene blue to remove fungus from the eggs.
Use A Heater
Angelfish eggs are extremely sensitive to changes in temperature. An adult will not mind the water getting a few degrees hotter or colder. An egg, however, has the risk of not hatching or they may hatch far later than normal or produce unhealthy fry as a result of the change in temperature.
Therefore, the temperature in your tank should be kept between 74 and 82 degrees. Installing a heater will help you maintain this temperature consistently.
Placing The Eggs
Just place the eggs inside of the tank at random is not a good idea. In the wild or even in your old tank, angelfish parents choose spawning spot very carefully. This spot has to be flat, out of direct light, and away from fast-moving water.
The same should be applied when you move the eggs to the new tank. In the same manner, the eggs must adhere to whatever substrate they are placed on. Without this, they may be swept away by currents.
It’s best to keep eggs upside down. This allows more oxygen to pass over them and keeps them safe.
Use An Airstone
Eggs need oxygen just like adults do. You should include an air stone in your new tank to keep the water properly aerated. Keep the air stone farther away from the eggs, then they will not be disturbed.
If you plan to keep the eggs in the original tank, whatever equipment you have should be sufficient enough for maintaining high oxygen levels.
Monitor The Light
Bright or harsh lighting will damage angelfish eggs. Especially when it comes to direct sunlight, UV radiation can be harmful to their developing cells. In addition, sunlight can lead to the growth of algae. Keep your aquarium away from windows as you should keep it in a secluded area.
Breeders often cover their egg tanks with blankets to achieve complete darkness. Some breeders use a standard light source. Both methods won’t harm the fish.
Watch For Filters
You should use a low-powered filter when raising eggs artificially, or place it far from the eggs to prevent eggs from becoming dislodged by strong water currents or suction.
Once hatched, the fry may be at risk of suckage into the filter by the intake valves that are not properly covered.
Control Fungus
For the artificial rearing of angelfish, a variety of anti-fungal / anti-bacterial additives have been proposed, such as Acryflavin, Hydrogen Peroxide, and Methylene Blue. Methylene Blue is a favorite of mine because it has never given me any problems, is readily available and seems to work. In the incubator, dose one drop of methylene blue for every gallon of water.
How To Remove Angelfish Eggs From The Tank?
Removing angelfish eggs from the original tank is a delicate process. The egg sacs are easily damaged. In fact, you won’t even know they’ve died until the eggs fail to hatch and begin to rot.
In this case, it is more convenient if your angelfish have laid their eggs on a movable object, such as a spawning plate or a leaf of a plant. You can easily pick up the object and move it to your new tank.
When transferring the eggs from one location to another, be careful not to leave them out of the water, as they can rapidly dry out.
Remove Angelfish Eggs When Using Breeding Slates
Using breeding slates is likely to be your best option. If you can put these inserts in the tank, the angelfish will find them to be very attractive to them.
Breeding slates are ideal places for angelfish to lay their eggs. If you have multiple breeding slates in the tank, you can encourage the female angelfish to lay her eggs on one of those slates.
There is no guarantee, but there is at least a possibility that the angelfish will try to use the slates.
They’re designed to be so easily removable that you can just grab onto them and then move them to another tank once the eggs are laid.
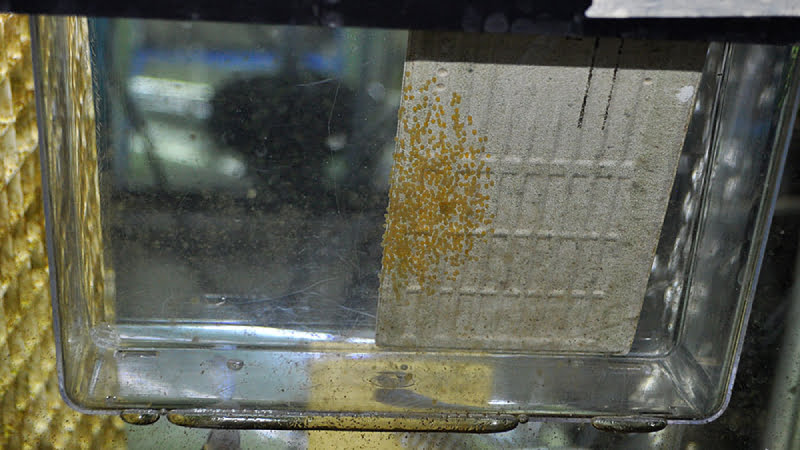
Remove Angelfish Eggs When They Are Attached To A Fixed Surface
If they are attached to a fixed surface, such as the glass, you need to be careful. To begin, you will need:
- A single-edge razor blade that has been treated with hydrogen peroxide
- A paper or plastic specimen cup filled with the original tank’s water
Prepare The Area
Since you will be using a razor and handling delicate eggs, you must make sure that the area is ready for operation.
- Turn off the filter and any air stones. Because if the filter is on, the current will sweep or suck up the eggs once they’re loose.
- You might want to remove the angelfish parents from the tank during this process. If they appear in your aquarium, they might race around, disturb the eggs, and even try to attack your hands.
- Take the cup and the razor and put them into the tank with your hands. Hold them in this position for a few seconds. During this time, the other fish will go crazy for a few seconds, but they will soon calm down. This should occur while you hold still, not while you carefully remove the eggs.
Once the tank has settled down, you can move on to the hard part.
Remove The Eggs From Their Surface
Eggs laid by angelfish are sticky and will stick to surfaces on which they are laid. For this reason, you must dislodge them safely by the razor before placing them in the cup.
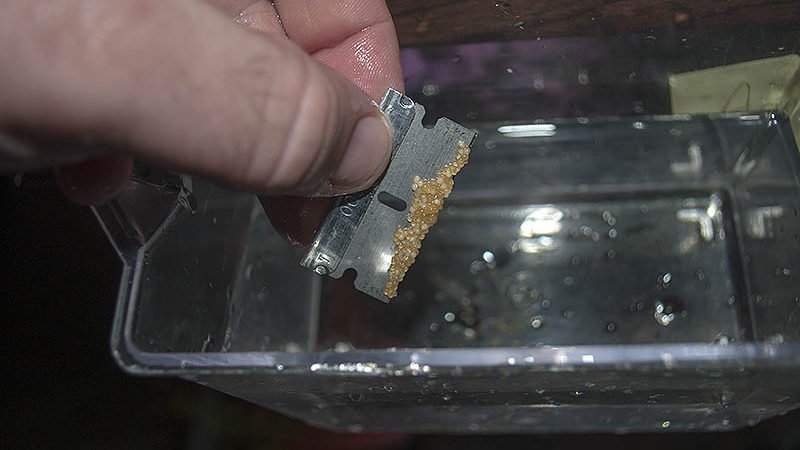
Firstly, tank the razor and place it right next to the eggs, parallel to the eggs at an angle of about 15 degrees. Do a smooth cut to the surface where the eggs are on. Move the razor right underneath the angelfish eggs until you have gently severed the bond between the egg and the surface. The eggs will not break if you do this carefully. The eggs will instead accumulate on the blade.
Place The Eggs In The Cup
Make sure that your cup is already in your hand and submerged in water. You are now able to gently move the eggs into the cup and press them gently into the inside of the cup as the eggs are now on the razor
It is also possible that the eggs will drift off of the razor and eventually sink to the bottom of the cup as you move it. In general, you do not have to worry about them drifting out of the cup as long as they have not been stirred up by panicked fish. They can now be placed into a fry basket or a new tank.
FAQs
Can angelfish eggs survive without the parents?
Angelfish eggs can survive without their parents but only when they are properly cared for. Taking proper care of them involves the following tasks: Prevent fungal infections by using a fungicide; Ensure that the temperature of the water remains consistent, especially if the eggs have been moved to a new tank; Use an air stone to improve the water’s oxygen level; Ensure that the water pH level is right, so the eggs are not shocked or jarred.
How long does it take to hatch angelfish eggs?
It is expected that the angelfish eggs will hatch within 60 hours of being kept at a temperature of 80oF. After they hatch, the fry will then go through a wiggler stage that will last about 5 days.
Is moving the angelfish eggs a good idea?
You might not want to move the angelfish eggs if you have no experience breeding fish. It’s not easy to care for angelfish eggs as a beginner. Eggs must be kept clean and safe when they are not being cared for by the parents. You can easily make mistakes. As a novice, it might be easier to let the parent fish take care of the eggs.
The parents of the angelfish will defend the eggs, and they will continue to defend the fry once they have hatched as well. However, it only happens only when everything goes as planned.
In some cases, parent fish don’t perform well, they may eat their own eggs and even the fry. There seems to be a good reason for removing the eggs from the tank.
Conclusion
There are times when natural hatching eggs fail. Whether angelfish parents are egg or fry eaters, or other inhabitants are to blame, there are times when the emphasis is on maximizing production. Then you can intervene by hatching angelfish eggs artificially.
It is a difficult task, but we can do it by following the steps I have described above. As the parents are absent, it is your responsibility to perform all their duties on their behalf. It is your responsibility to make sure that all conditions are favorable for the eggs to hatch.

Annette M. Chaney is an experienced marine biologist with over 20 years of experience as an aquarist and fishkeeper. She started her first aquarium at a young age, filling it with frogs and goldfish obtained from the ten-cent pet store.
Annette grew up caring for and breeding African Cichlids, which led to a hobby in high school that doubled as a profitable means. Attending Reed College gave her time to solidify herself as an accomplished aquarium caretaker with an eye for sales. After that, from 2009 – 2013, she studied at Roger Williams University – one of the most prestigious universities for Aquaculture and Aquarium in USA. She is the founder of AquariumCircle since 2010.