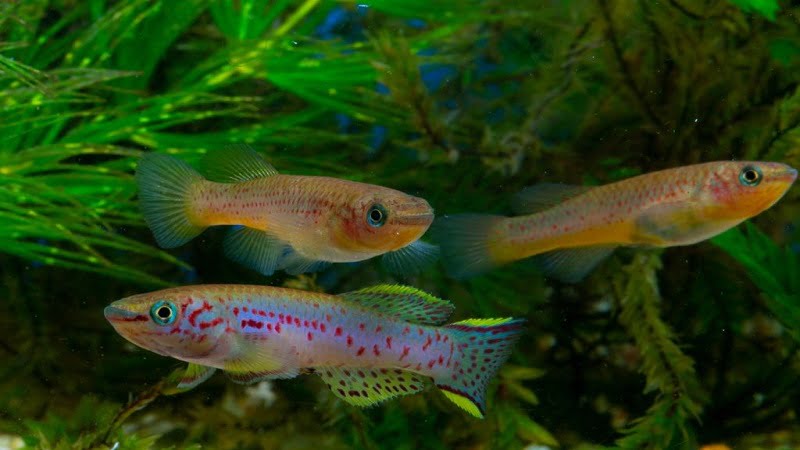
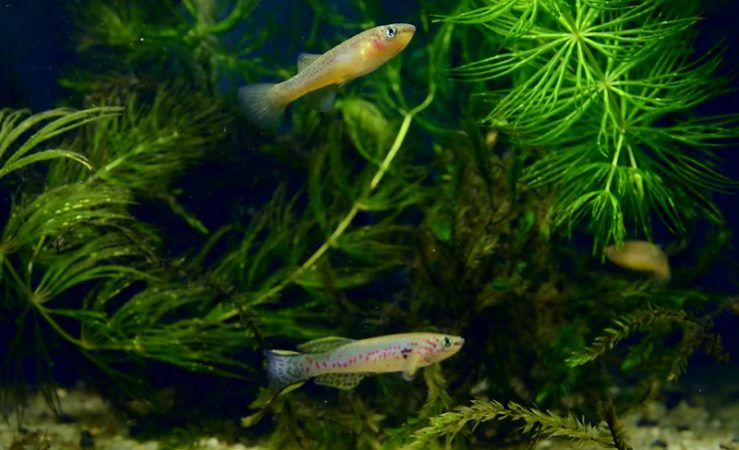
The Gardneri Killifish, also known as ‘Gardner’s Killi’ and ‘blue lyretail’, is one of the largest fish varieties available in aquariums. They are also considered the best choices for beginners because of their hardiness, colorfulness, and easy-breeding feature. Adding them is probably a perfect choice to make your tank more vibrant and attractive.
To succeed in keeping Gardneri Killifish in your fish tank communities, knowing suitable methods of gardneri killifish breeding, as well as the complete caring guide, is the key. Let’s find out the essential information in this article.
Overview Of Gardneri Killifish
Here are some pieces of information about the Gardneri Killifish:
- Scientific Name: Fundulopanchax gardneri
- Family: Aplocheilidae
- Lifespan: 2 – 5 years
- Size: 2 – 3 inches
- Tank Size: 5-10 Gallons
- Care Level: Easy
- Temperament: Semi-Aggressive
- Diet: Carnivore
- Origin: Captive Bred- Africa
- Cost: ~ $7.99
Gardneri Killifish Breeding Methods
The gardneri killifish is a semi-annual breeding type, thus their breeding process is longer and slower than the annual ones. Moreover, most of them are plant spawners, which means they lay eggs on floating or submerged plant thickets. Therefore, the suitable Gardneri Killifish Breeding methods are the ones used for the plant spawner.
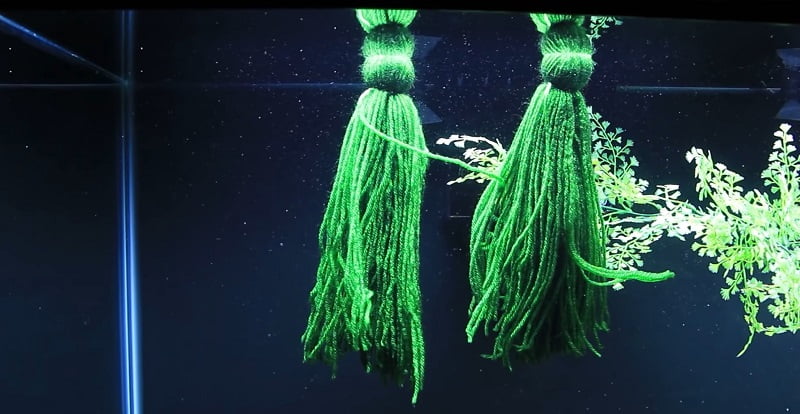
Spawning mops
Using mops that are made of nylon or 100% acrylic yarn is the most favored and long-term breeding method for plant spawners, and the gardneri killifish in particular. They will lay their eggs on the strands of yarn.
Mop construction:
The mops should not be constructed with organic yarns, like wool or cotton, since this kind of material is easy to deteriorate in the water. Choosing the mop color is not strictly required but it is recommended to use dark colors, especially dark green. Boiling the mop before utilizing is essential.
Making the mops is not too complicated. You can follow these steps:
- For floating mops, you should use a cork having a 1.5-inch diameter and a 3/4 – 1 inch thickness.
- Cutting a narrow groove around the entire circumference of the cork.
- Wrapping the yarn around a rigid piece of cardboard or a book of appropriate size, about 30-50 times. It is essential to ensure the width of the wrapping is the same as the circumference of the cork.
- Cutting several strands of yarn and threading beneath every wrapped strand.
- The entire wrapped yarn is then slipped off and tied to the cork
- Uniformly adjusting the distribution of the strands around its circumference.
- Finally, the strands are cut opposite the cork so that each strand hangs separately.
- For bottom spawning killifish, the mops are made without using the cork and by simply tying at one end of the strand. This will get the mops easily sink to the bottom of the tank when being thoroughly wet.
Tank setup:
The tank should be empty when placing the breeding mop. Since the breeding tank includes plants, gravel, or substrates, the extra places for killifish to lay their eggs are provided. Thus, the number of eggs on the breeding mop is reduced, making the egg-collecting process more difficult.
The breeding tank should include a pair of killifish only. Introducing one more female may reduce the egg number as the third fish may follow around the spawning pair and eat the newly laid eggs. Moreover, the parent fish should be fed well before being introduced to the mops.
Collecting, Incubation, and Fry:
The mops should be removed carefully from the breeding tank, every two or three days, to collect the eggs. It should be squeezed gently to remove excess water because the fish sometimes hides in there. Then roll it in an absorbent towel for several minutes. After that, the eggs can be collected, and water incubated (in tank water with a dash of methylene blue) or damp-peat incubated (place a small droplet of water/methylene blue on each egg). In both ways, it is important to remove fungus eggs as soon as possible, to avoid affecting the other healthy eggs. Besides, you can move the whole mops to empty tanks or put the damp mops in a plastic bag for the undisturbed incubation.
The permanent set-up method
This method simulates the natural spawning method. Specifically, the fish spawn in the tank water, and when the eggs hatch, the fry appear, moving either the fry or the parent fish to a new tank. This is because the spawning fish may eat their young.
Tank setup:
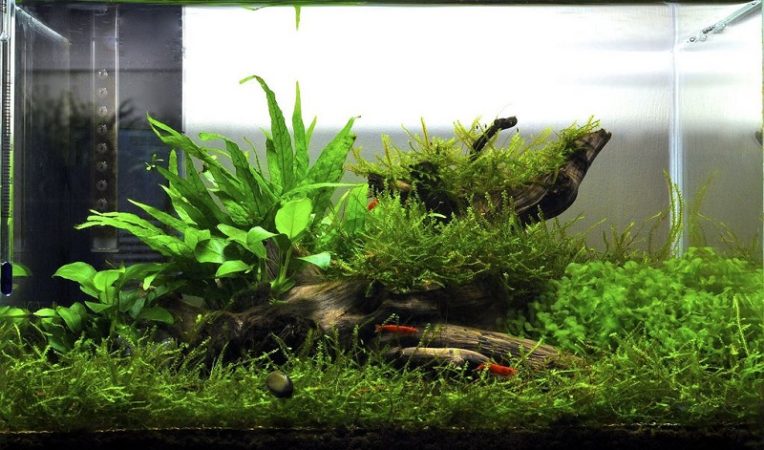
A larger tank may be a perfect choice when using this technique. The breeding tank should be filled with plants or mops, such as najas, Indian fern, java moss, java fern, hornwort, and riccia. It is critical to check and ensure that the tank does not have any snails since they will eat the newly laid eggs. The parent fish should be fed well for at least one week before being moved to another tank. The brightness of the light should be reduced a little, if possible.
Collecting, Incubation, and Fry:
Closely monitor the fry which often appears at the water’s surface at first. Once notice any individual outgrowing and bothering its tankmates, moving them to another space should be considered.
Long term (fry appear with adults)
This is an ideal breeding method for plant spawners like gardneri killifish, and great for small tank space. Allowing the fry to fend for themselves probably generates robust fish, thus this is the breading method suitable for the quick-growing hardy fish species.
Tank setup:
Larger tanks are the ideal choice for this breeding approach. The places for the fry to hide from the adult fish should be provided. This can be made by filling the tank with plants, such as najas, which can fill the whole tank and give the most cover, Indian fern, java moss, java fern, hornwort, and riccia. Also, the shallow gravels or sand substrates are great for offering shelters or hiding places for the fry. Spawning mops can be alternatively utilized as long as it provides unending hiding places to keep the fry separate from the larger fish.
Collecting, Incubation, and Fry:
You can optionally remove the fry and raise them separately to avoid predation by their parent or bigger siblings, or let them fend for themselves.
You should regularly feed the tank with the newly hatched artemia (whether the fry appears or not) because it can significantly increase the success when applying this gardneri killifish breeding technique.
Peat (or similar) spawning substrate
It is found that many non-annual killifishes readily spawn into a substrate of peat moss, therefore, this technique is not only suitable for annual fish species but also the non-annual including the gardneri killifish.
Tank setup:
You can get the peat to cover the entire tank bottom or place it in one or more spawning ‘tubs’. The spawning tubes here are the plastic containers often featuring a lid with a hole for the fish to spawn in. The purpose of using peat moss is to prevent egg predation.
Collecting, Incubation, and Fry:
The peat is taken out and the excess water is drained off. Then, the peat moss is simply put in plastic bags for 3 – 4 weeks or dried on newspaper for between 2 and 24 hours. The importance is to keep the peat moist but not wet. The dryer peat moss seems to stimulate the development of eggs, yet you should carefully monitor the eggs for development.
Care Guide
Aquarium requirements
Tank setup requirements:
The requirement of tank setup for the gardneri killifish are:
- Housing a killifish fish pair needs a 20-gallon tank.
- Owing to their natural habitat, a long shallow tank with very low, or no water movement is required, and the light should be kept to a minimal level.
- The tank should be full of live plants, mainly floating plants. Plants suitable for the tank of killifish consist of the cryptocorynes because they are compatible with low lighting levels.
- The tank floor can have bare, or covered with dark gravel, or peat moss.
- Hiding places should be provided, which can be made with the roots of floating plants, rocks, or wood.
Water Requirements:
- Temperature: 20 – 26 °C
- pH: 6.0 – 7.5
- Hardness: 18 – 179 ppm
- Filtration: optional, but water cleanliness is important.
If your tank is small (5 gallons/ 16 liters or less), a filter or aeration may not be necessary equipped, but you have to change the water every few days to keep the low level of dissolved pollutants. If you use a 5- to 10-gallon (16- to 38-liter) tank, a sponge filter is adequate to provide sufficient filtration along with some aeration.
Diet and feeding
Providing a balanced and varied diet is important to successfully keep the killifish in your fish tank, especially in terms of gardneri killifish breeding. Many gardneri killifishes are small predators that eat primarily live foods including insects and crustaceans in the wild. Frozen and dry foods are also good for the adult Gardneri. However, their diet should comprise various food types, and avoiding feeding single food all the time since this can cause nutritional imbalances and deficiencies. Let’s look at the suitable list of foods that you can add to the menu for your gardneri killifishes.
Feeding Adult Killifish
- Brine Shrimp: a good nutritional live-food source for most killifish. Frozen shrimp can be used but avoid feeding exclusively.
- Daphnia: a popular live food for killifish, and can be collected from pools and ponds.
- Mosquito Larvae: an excellent live food for your killifish, available seasonally, and can be collected from standing water and ponds.
- Tubifex Worms: can be collected from filthy places, like sewage run-offs and similar places, or purchased from some stores. It can transmit disease, so to avoid this, the worms should be rinsed thoroughly under cold water in a shallow tray, before feeding on the killifish.
- Blackworms: Blackworms are also excellent food for killifish, and can be purchased from a store or from the companies that grow them.
- White Worms: excellent live food for killifish but fatty, so should not be exclusively feeding.
- Fruit Flies: the two fruit fly (Drosophila) mutants, vestigial wing and flightless, are great live food for killifish.
Foods for Newly-Hatched Killifish Fry
The newly-hatched brine shrimp and microworms are a great live food source for the young Gardneri because they are inexpensive and easy to find. The fry should be fed with these foods exclusively in the first month. When they mature, you can consider adding dry foods to their diet.
The list below introduces the most suitable first food for the fry of the gardneri killifish:
- Newly-Hatched Brine Shrimp (nauplii of Artemia)
- Microworms
- Vinegar Eels
- Infusoria
- Grindal Worms
Tankmates
The gardneri killifish is quite peaceful and can be kept with other fishes that have the same size and temperament. It is ideal to keep 2 – 3 females per male so that no individual is singled out for excessive attention from the male(s).
If you want a community tank including gardneri killifish, their mates should not be too colorful since the colorful fish may be seen as competition and be attacked.
Some suitable tank mates for gardneri killifish are:
- Danios
- Barbs
- Tetras
- Corydoras
- Clown Loach
Notes
– One or two weeks before the gardneri killifish breeding period, feed live foods to them is a good choice as this may stimulate the egg production.
– Keep the water clean is vital to avoid diseases, helping the killifish to stay healthy.
– Remember to keep the tank’s lid close as they are high jumpers and may fall out of the tank when the tank is open.
Video: Gardneri Killifish Breeding Methods
FAQs
How to do a non-annual gardneri killifish breeding?
Generally, you should provide the spawning platform in the aquarium for them to lay their eggs. Depending on the techniques, the spawning platform can include mops, peat moss, sands or gravel substrates.
How do killifish breed?
The eggs are fertilized internally and then the female Killifish will lay her eggs on the sands, peat moss, etc., depending on the species. From there, the eggs will hatch, the fry will appear and grow, and finally, they will mature. Then, the cycle will repeat itself.
How long do gardneri killifish eggs take to hatch?
Their eggs take 21 to 30 days to hatch depending on the temperature.
Conclusion
The Gardneri Killifish is relatively inexpensive but has a beautiful appearance that certainly adds various vibrant colors to your tank. Besides, though have a peaceful temperament, they also show aggressiveness toward the larger, aggressive, and too colorful fish. Thus, you should choose suitable tank mates with the same size and temperament as them for a harmonious community.
To breed Gardneri Killifish, choosing suitable methods is essential. As they are non-annual and plant-spawner fish species, the article demonstrates four gardneri killifish breeding techniques that are applied for this type of fish. I hope that the provided findings help you understand more the way and process of breeding this beautiful killifish species.

Annette M. Chaney is an experienced marine biologist with over 20 years of experience as an aquarist and fishkeeper. She started her first aquarium at a young age, filling it with frogs and goldfish obtained from the ten-cent pet store.
Annette grew up caring for and breeding African Cichlids, which led to a hobby in high school that doubled as a profitable means. Attending Reed College gave her time to solidify herself as an accomplished aquarium caretaker with an eye for sales. After that, from 2009 – 2013, she studied at Roger Williams University – one of the most prestigious universities for Aquaculture and Aquarium in USA. She is the founder of AquariumCircle since 2010.